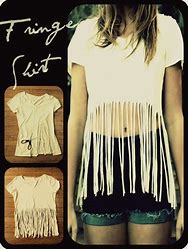
DESIGN YOUR OWN STYLISH FRINGE T-SHIRT
HERE'S A STEP-TO-STEP GUIDE OF MAKING A FRINGE T-SHIRT:
A fringe t-shirt is a shirt that features strips of fabric hanging down, usually at the bottom, along the sleeves, or around the neckline. The fringe is typically created by cutting the fabric into thin, vertical strips, giving the shirt a bohemian, fun, or edgy look.
This trend is perfect for casual outings, music festivals, or making a statement in everyday wear. Have you spotted any particular styles you’re drawn to.
Fringe t-shirts are making a comeback, blending a bohemian flair with modern street style. The trend is characterized by t-shirts with fringed edges or hems, often inspired by retro and festival aesthetics. Here are some of the latest trends and variations:
1. Festival Vibes
- Fringe t-shirts with tie-dye patterns or bold graphics.
- Worn with denim shorts, cowboy boots, or layered with oversized accessories.
2. Minimalist Chic
- Solid-colored t-shirts with subtle, thin fringes for a more understated look.
- Neutral tones like beige, white, and black are popular for a refined feel.
3. DIY Aesthetic
- Custom-cut fringe t-shirts from oversized tees, often paired with beaded or braided fringes for a personal touch.
- Upcycled or repurposed tees are trendy for their sustainability.
4. Statement Fringe
- Fringe in unconventional placements, like across the chest or shoulders, rather than just at the hemline.
- Bold colors and metallic fringes for a dramatic effect.
5. Layering Game
- Fringe t-shirts styled over fitted long-sleeve tops or under cropped jackets.
- Mixed fabrics, like cotton tees with leather or suede fringe details, for texture contrast.
MATERIALS REQUIRED:
- A t-shirt (preferably slightly oversized or loose-fitting for the best fringe effect).
- Scissors, Ruler or measuring tape.
- Fabric chalk or washable marker (optional).
- Beads or embellishments (optional)
STEPS:
1) PREPARE YOUR T-SHIRT:
- Lay the t-shirt flat on a smooth surface.
- Decide where you want the fringe.
- For example: At the bottom hem for a classic fringe look.
- At the sleeves or neckline for a more unique style.
- Smooth out any wrinkles to ensure even cuts.
2) MARK THE FRINGE AREA:
- Use a measuring tape and chalk to draw a horizontal line across the shirt where the fringe will stop.
- For a bottom-hem fringe, mark the line around 4-8 inches above the hem, depending on your desired fringe length.
- Ensure the line is even all around.
3) CUT THE FRINGE:
Start at the bottom hem. Using scissors, cut vertical strips upward to the marked line.
- Width of Strips: Keep each strip about ½ inch to 1 inch wide.
- Spacing: Keep the strips evenly spaced for a polished look.
- Repeat this process around the shirt.
4)STRETCH THE STRIPS:
Stretching the strips is a key step in making a fringe t-shirt as it enhances the look by giving the fabric a curled or rolled effect, which makes the fringe appear polished and lively. Here’s a detailed guide to stretching the strips:
Why Stretch the Strips?
- It eliminates sharp, straight edges from the cuts.
- The fabric curls in on itself, creating a more rounded and natural fringe look.
- It prevents the fabric from looking flat and stiff.
Stretching Method
Grip Each Strip:
- Hold the top of one strip near the base (where it meets the uncut part of the shirt).
- Use your other hand to hold the end of the same strip.
- Stretch the Strip:
- Gently but firmly pull the strip outward or downward, stretching it until you feel a slight resistance.
- The fabric will naturally curl in on the edges due to the tension.
3.Check the Length:
- After stretching, the strip may become slightly longer.
- Check it against the other strips and adjust if needed.
- If one strip stretches more than the others, simply trim it to match.
3. Repeat for All Strips
- Work one strip at a time to ensure consistency.
- You can alternate pulling directions (outward or downward) to control how the fringe flows.
4. Optional: Fine-Tuning the Curl
- If some strips don’t curl as much as you’d like:
- Roll them: Wrap the strip around your finger and gently let it spring back to encourage a curl
- .Heat Method: For stubborn cotton fabrics, lightly tug the strips and then press them with your warm hands (body heat can help the fabric set in place).
Pro Tips:
- Fabric Matters: Stretching works best on t-shirts made of cotton or jersey material, as these fabrics naturally curl when cut.
- Avoid Over-Stretching: Pull gently to prevent distorting the shape of the fringe or tearing the fabric.
- Batch Stretching: For faster results, stretch 2-3 strips together if they’re uniform in width and length.

5) CUSTOMISE FURTHER:
- To DIY a fringe t-shirt, start with an old or oversized tee.
- Mark even lines at the hem or sleeves with chalk or fabric marker, then use scissors to cut strips (about 0.5–1 inch wide).
- For added flair, knot the fringes, braid them, or add beads for a boho vibe.
- This simple customization is perfect for creating a unique, upcycled look!
EXTRA TIPS FOR PROFESSIONAL LOOKS-
- Practice First: Test your cuts on an old or scrap shirt to get comfortable with the process.
- Use Sharp Scissors: Dull scissors can cause jagged edges.
- Measure Twice: Ensure your fringe strips are uniform in width and length.
- Experiment: Play with different fringe lengths, widths, or patterns (e.g., alternate long and short strips).

